Audio media has been an important part of our lives ever since the first news reporters crackled their way into homes in 1920. For a while, it was assumed that visual media and then the internet would be the death of audio-only entertainment, but it turned out that this obit was premature.
Podcasting has brought new popularity to audio. From book readings to investigative reporting to political opinion to interviews to theatrical productions, podcasts offer a wide range of entertainment and information.
And what’s even better: podcasting is a creative form available to anyone who has a computer, a microphone, and an internet connection. We spoke to Andrew Marino, audio engineer and producer at The Verge, to find out what he recommends for those who want to try this out as well.
What follows are Andrew’s thoughts about podcasting and the tools he prefers to use.
What you need
There have been a lot of different ways people have developed podcasts, since a lot of them start out at different levels. At its heart, it’s an independent DIY media platform, although more recently it has been co-opted by larger media companies coming from radio backgrounds.
What you need to start with is a microphone and an audio interface (a way to record your audio directly into your computer). Once your podcast is recorded, you’ll then need a digital audio workstation (DAW), which is the software you’ll use to edit, mix, and export your podcast. You should also have some knowledge of microphone tech, recording, editing, and mixing to make your show sound its best.
Microphone
:no_upscale()/cdn.vox-cdn.com/uploads/chorus_asset/file/21954029/RE20_screen_shot.png)
You mostly want a microphone with a cardioid polar pattern. This means it’s a directional microphone that focuses on picking up what’s directly in front of it (your voice) and attempts to reject everything else (the rest of the sound of the world).
The digital-to-analog converter (DAC) built into USB mics is typically not as good as a standalone audio interface, so as a professional, I tend to stay away from USB mics when I can. It also limits you to one input, whereas a more professional microphone is not attached to a DAC, allowing you to plug it into any microphone input, from a USB interface to a sound board at a live venue.
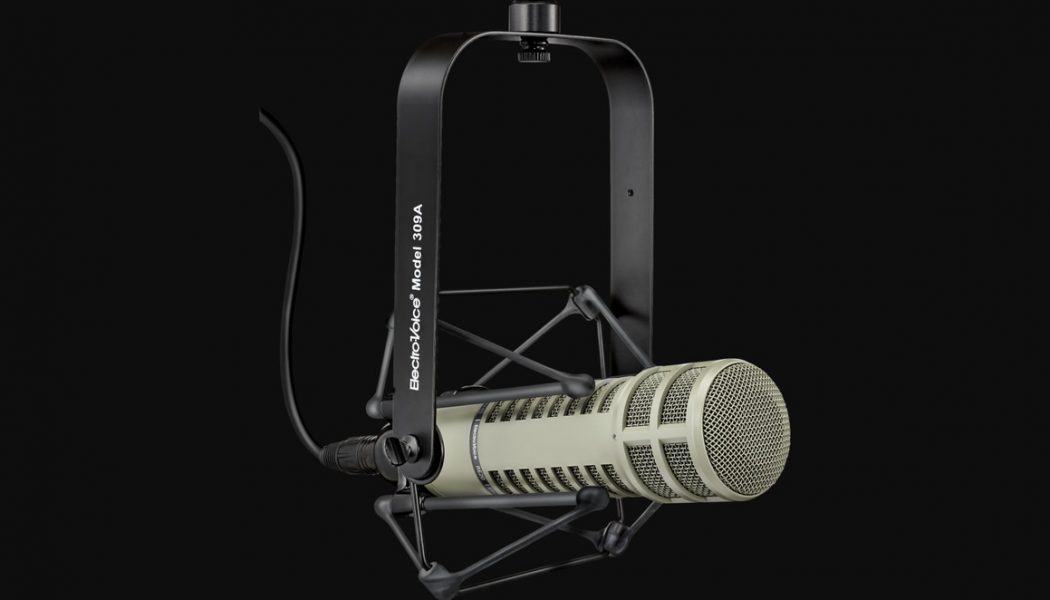
I have an Electro-Voice RE20; there’s also the RE27. It’s a typical dynamic microphone — it pretty much carried over from radio to podcasting. It’s best for voice recording. I went to school for music, so we used it a lot for recording a drum set, but if you go into any radio studio, you’ll see either an RE27 or a Shure SM7B. A lot of podcasters use the SM7B, but it requires a preamplifier (like this one) for optimal signal level. The RE20 and RE27 don’t necessarily need that.
When I’m out in the field, I’ll use a shotgun microphone: a long condenser that can pick up sources from farther away. A lot of people use a large condenser mic for narration or vocals in songs and music, but it should only be used in a controlled environment like a studio.
Audio interface
:no_upscale()/cdn.vox-cdn.com/uploads/chorus_asset/file/21954087/scarlett2i2_screenshot.png)
We’ve been giving our podcasters at Vox Media who record outside of our studios a Focusrite Scarlett 2i2 audio interface. It’s pretty affordable and durable, with a metal casing. This USB interface offers two microphone inputs as well as outputs for monitors; you can plug any analog mic into it. There are tons that do that, but the Focusrite has a good price for the quality.
Editing
:no_upscale()/cdn.vox-cdn.com/uploads/chorus_asset/file/21961111/Screen_Shot_2020_10_13_at_3.13.33_PM.png)
The next step after recording your podcast is the editing phase. Even the most minimal podcast requires some editing to take out unnecessary space, add music, balance levels, and fix any other mishaps in the recording process. To do this, most people use software called digital application workspaces or DAWs.
There are many DAWs you can use to edit your podcast; in fact, you may have used a DAW to record your podcast. I still sometimes use a free, open-source software called Audacity to do quick audio edits, and it’s very popular among DIY podcasters.
Audacity was the first software that I used when I got into editing because it’s free and it’s very flexible. It has many built-in effects and controls that you can use just by downloading it, such as change pitch, compression, equalization (EQ), and multitrack editing. It’s not as flexible as other software, but you can still edit a whole podcast with it.
But while some DAWs are free, the ones you pay for tend to offer more detailed editing tools and better-sounding effects. I am able to work faster, more efficiently, and am more flexible when I’m using a more professional DAW like Avid Pro Tools or Adobe Audition.
I use Avid Pro Tools for recording, but for editing, I mostly use Adobe Audition. In my experience using both DAWs, the workflow is faster for importing and mixing clips, and editing is significantly more efficient. Pro Tools is based more on an analog system for music and preferred among a majority of my colleagues, but for long-form podcasting, I’m going to use Audition.
I would also recommend using some audio software plug-ins to help with the mixing process. A big part of podcast mixing is adjusting and controlling the levels of everyone’s microphones. The company Waves offers some affordable bundles and individual plug-ins for dynamic compression, equalization, reverb, pretty much any sort of modulation you want.
Something I’ve been using a lot this year is iZotope’s RX 7 audio repair software (they’re up to version RX 8 now). Since everyone — including the hosts on our shows — are recording at home, it’s sometimes hard to control the audio environment remotely. I do a lot of “de-noising” to take out air conditioning noise, street noise, etc. I also use “de-plosive” (watch your “P”s) and “de-clipping” (watch your levels), which have brought the quality of the recordings up to our standards.
Distribution
:no_upscale()/cdn.vox-cdn.com/uploads/chorus_asset/file/21956523/feeder_software.png)
For the most part, podcasts can be distributed through the magical world of an RSS feed. It’s an older tech in internet terms, but one of the few mediums that still really takes advantage of the open web, which is why I love it. When a listener uses a podcast app, that app usually grabs the feed from your RSS, which contains audio files from your show as well as other data like your title, album art, description, etc.
For my personal podcast, I set up an Amazon S3 server and edit the feed through an RSS editor called Feeder, which is pretty bare-bones. I chose this simply because it was the cheapest option. You’re paying for server space, so if you’re starting a podcast and you don’t have a lot of listeners, you’re paying almost nothing to host the podcast. However, you have to be a little technical savvy and it’s not automatically secure. Podcast platforms like Spotify and Apple recommend your hosting server support SSL (Secure Sockets Layer), which allows you to generate an HTTPS RSS feed.
If you want something more user-friendly, there are other services that operate servers for podcast RSS feeds and let you simply upload your audio and relevant information; your podcasts will be published to the various podcast platforms. They also offer services like analytics and monetization. Some popular hosting services include PodBean, Spreaker, Anchor, and Libsyn.
Final advice
Don’t be overwhelmed or intimidated by the rest of the industry. Podcasting is still in its infancy and was meant for the people. Anyone can make a show and that’s wonderful! Make your show about what you want to make it about and don’t worry about trying to sound like other shows. It’s a wonderfully creative medium and you should take advantage of it.
