Yes, of course you want to back up your iPhone — as we all know, despite phone cases and Gorilla glass and careful engineering, disaster — in the form of cracked displays, lost devices, and three-year-olds who think it’s fun to sit on your latest phone — can happen. When that happens, you want to have all your data backed up.
The easiest way to go is to back up using iCloud, which is not only simple to set up, but makes it just as simple to set up a new phone if your old one is no longer available. (You can also back up to other services, such as Google Drive, but it isn’t nearly as convenient.) Or, if you’re an iPhone user who is steadfast about retaining your privacy, you can back up your iPhone to your Mac or Windows computer and retain full control of your data backups.
Here’s how to back up to iCloud or your laptop / desktop.
Back up to iCloud
- Tap on “Settings” > [your name] top button > “iCloud” > “iCloud Backup.”
- If “iCloud Backup” is switched off, toggle it on. If it’s already toggled on, and you’re preparing to wipe your old iPhone, you may want to tap “Back Up Now” just in case.
Back up to your desktop
- Connect your phone to your computer using its charging cable.
- Fire up iTunes if you’re using Windows or a Mac with macOS 10.14 or earlier; use Finder on a Mac with macOS 10.15 Catalina or later.
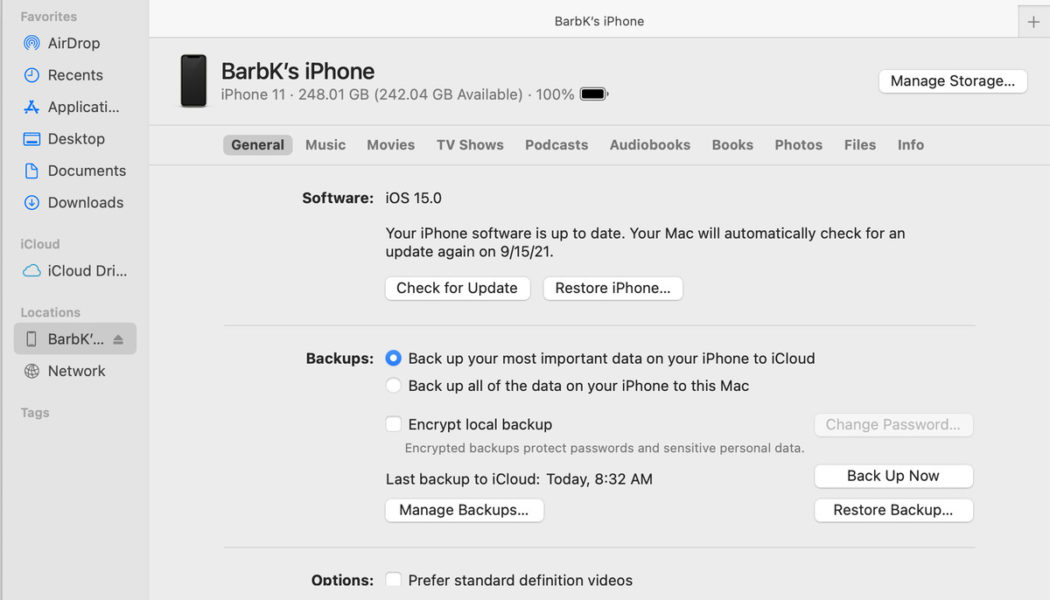
If you’re using Finder, open a Finder window (by either clicking on the Finder icon in your dock or selecting “File” > “New Finder Window” in the top Finder menu bar), and look for your iPhone in the left-hand menu under “Locations.”
:no_upscale()/cdn.vox-cdn.com/uploads/chorus_asset/file/22850810/Back_up_local.png)
- In iTunes, you should see a small iPhone icon in the upper left corner; select that. (If you don’t see it, you may need to authorize your system. Go to the top iTunes menu and select “Account” > “Authorizations” > “Authorize This Computer…” and follow the instructions.)
:no_upscale()/cdn.vox-cdn.com/uploads/chorus_asset/file/19621952/capture1.png)
- After that, the process for either iTunes or Finder is much the same, although the look of the pages and the language will be slightly different.
- If this is the first time you’ve done this, when you click on the phone icon, you may be asked if you trust the phone, first on the computer and then on the phone itself.
- First-timers may also be asked if you want to set your phone up as a new device or restore it from a previous backup. In this case, select the first.
- Select the “General” tab on top and look for the category labeled “Backups.” Select “This computer” (in iTunes) or “Back up all of the data on your iPhone to your Mac” (in Finder).
:no_upscale()/cdn.vox-cdn.com/uploads/chorus_asset/file/22850821/Back_up_local.png)
- You’re going to want to encrypt your backup for increased security. Check “Encrypt iPhone backup” (in iTunes) or “Encrypt local backup” (in Finder) and enter a password. Don’t lose that password; otherwise, you’re going to lose access to your data.
- Once you set the encryption, it’s probable that the backup will start automatically. Otherwise, click on “Back Up Now.”
:no_upscale()/cdn.vox-cdn.com/uploads/chorus_asset/file/19621934/iTunes_Windows.jpg)
If you need to restore your backup, just go to the same page and click on “Restore Backup…”
Note that you can either manually back up your iPhone, or you can also have it automatically back up each time you connect it to your computer. Look for “Options” just below the “Backups” section, and select “Automatically sync when this iPhone is connected.”
Once you’ve set up your backup to your computer, you may want to delete any backups you’ve made to iCloud.
To do this on your Mac:
- Click on the Apple icon in the top corner of your system.
- Select “System Preferences” > “Internet Accounts” > “iCloud.”
- Select the “Manage” button in the lower right corner of the window and then “Backups.”
:no_upscale()/cdn.vox-cdn.com/uploads/chorus_asset/file/22850826/Screen_Shot_2021_09_14_at_3.55.51_PM.png)
- Select a backup to delete, click on the minus icon in the lower left of the window, and select “Delete.” This will both delete all your backups from iCloud and turn off any further backups.
To do this on your iPhone:
- Go to “Settings” and tap your name.
- Select “iCloud” > “Manage Storage” > “Backups.”
- Tap on “Delete Backup.”
- Tap on “Turn Off & Delete.”
:no_upscale()/cdn.vox-cdn.com/uploads/chorus_asset/file/22850828/delete_iphone_icloud_backup.jpeg)
:no_upscale()/cdn.vox-cdn.com/uploads/chorus_asset/file/22850830/delete_iphone_icloud_backup2.jpeg)
And you’re done!
Update September 15th, 2021, 10:20AM ET: This article was originally published on January 23, 2020 and has been updated to add directions for updating with iCloud and to update the other instructions.


