NFTs have become a cultural phenomenon over the past year, constantly making headlines as celebrities dabble in the space and as shenanigans, scams, and legal fights ensue. While it’s hard to tell if they will retain or regain their popularity after a market slump or two, there are still plenty of reasons someone might want to try their hand at making one. Who can resist a field that creators have made millions from?
We’re going to go over how to create an NFT using two of the most popular marketplaces, but before we get to that point, let’s cover some of the basics of what an NFT is and the decisions you may have to make before deciding to sell one. (If you’re relatively up to speed, you can go to Step 3 to begin the journey of actually creating a token.)
Step 1: Figure out what an NFT is
Listen, there’s no judgment if you’ve arrived here without much understanding of what NFTs are. Maybe a friend said, “Hey, you should sell that picture of your cat as an NFT.” But before you go through the process of creating and selling one, it’s probably best to have some idea about what you’re doing.
We have an entire explainer going into NFTs and the culture around them, as well as an explainer on the blockchain technology that NFTs use. You don’t have to study every word in them, but the rest of this guide will make references to things like Ethereum, proof of work, and other similar concepts that you’ll get a better understanding of by reading our explainers.
Here’s a quick TL;DR, though. NFTs, or non-fungible tokens, are digital tokens stored on the blockchain. Unlike cryptocurrencies, where each coin is the same (there’s no reason to prefer one particular Bitcoin over another), each NFT is unique and can be sold as a way to prove ownership over some sort of digital file.
In almost every case, the files aren’t actually stored on the blockchain itself. Rather, a link to the file is stored, along with the token that acts as proof of ownership over whatever that link points to. There’s also no rule saying that two or more NFTs can’t exist for the same file — you can have NFTs with editions, kind of like trading cards. For example, an NFT can be rare because there are only 10 copies or common because thousands of the same NFT have been “minted,” or written to the blockchain. There’s also nothing to stop someone from taking the file you’ve used for your NFT and creating their own NFT with it (though the blockchain entry will show that it came from their account, not yours).
You can technically sell any digital file as an NFT, but if you’re looking to use a marketplace’s easy minting tools, you’re going to be limited to the formats they support. We’ll touch on that a bit more later, but it’s worth keeping in mind that your first NFT should probably be an image, video, or audio clip of some sort. If you don’t know what you want to sell as an NFT yet, those kinds of restrictions could help you narrow down the possibilities. With that said…
Step 2: Make sure you actually want to sell an NFT
If you just have the vague idea that you want to make an NFT because seemingly everyone is doing it, there are a few considerations you may want to take into account. The first big one is transaction fees. While the platforms that we’ll cover today will let you create NFTs for free, selling them could be a different matter.
Most NFTs are sold on the Ethereum blockchain (we’ll touch on ones that aren’t in the next section), and every transaction on the Ethereum blockchains costs fees that are paid to the miners. These fees are called “gas,” and the amount of gas you need for a transaction (and therefore how much that transaction will cost) can vary significantly. Almost everything you do on the blockchain, from minting an NFT to transferring it to someone else to bidding to purchase one, will cost gas (though there are some ways around this for creating NFTs, which we’ll go over in a moment).
It’s also worth noting that paying gas does not 100 percent guarantee your transfer will go through. You can pay more to give yourself a higher chance, but it is never a sure thing. To be clear, most transactions are likely to go through. However, if something does happen and your transaction isn’t completed, you won’t get the gas fees you paid back.
Then there’s the environmental aspect of NFTs. The most popular (and easiest to use) NFT marketplaces mostly run on the Ethereum blockchain, which uses an energy-intensive “proof of work” system (you can read more about what that means here). While there’s debate on whether individually selling NFTs has an effect on the overall energy use of the blockchain, if your NFTs are built on Ethereum, you are making use of a system that has a big carbon footprint.
There are blockchains that use alternate systems that don’t use as much energy, and Ethereum has plans to move to a more efficient proof of stake system at some point in the future. However, that’s not the case yet, which is one of the reasons people might get upset when others decide to sell NFTs.
Step 3: Choose a platform to sell your NFT on
There are dozens of platforms that let you sell NFTs across a wide variety of blockchains, so it’s almost impossible for any single guide to cover them all, much less tell you which one is the right one for your project. We’ll be covering two of the more popular marketplaces in this guide, but do know that there are alternatives if neither of these platforms fit what you want to do, like AtomicHub, which uses the Wax blockchain, or the Solana-based Solsea.
It’s also worth noting at this point that our guide will show you how to do things the basic way. Even with NFT markets, there are deep rabbit holes you can go down that won’t be covered in this guide (things like selling an NFT minted with OpenSea on Rarible, programmatically generating collections like Bored Apes, and so on). Just know that this isn’t meant to be a comprehensive compendium on selling NFTs — it’s just getting you to the path.
Both OpenSea and Rarible let you create NFTs on Ethereum without paying anything, thanks to what they call “lazy minting” systems. Lazy minting lets you create an NFT and put it up for sale without it actually being written to the blockchain, thus avoiding any fees. When someone actually buys it, the fees for writing your NFT to the blockchain will be bundled with the fees to transfer it to the buyer. That helps you avoid the situation where you pay $10 to $30 (or more!) to mint an NFT that no one ends up buying.
There can be catches — with OpenSea, listing your first Ethereum NFT for sale will require initializing your account, which will cost money (during testing in June 2022, I saw prices around the $60-70 mark). It is a one-time fee, and after paying it, you’ll be able to lazy mint NFTs without having to pay anything.
With Rarible, I didn’t have to pay this sort of fee during my testing. However, trying to remove your NFT from sale will cost a fee (I saw prices around $6-8). Both Rarible and OpenSea will take a 2.5 percent fee from any sales you make — if you sell an NFT for 0.025 ETH, you’ll actually receive 0.024375 ETH.
There are, however, alternatives to the Ethereum blockchain. Rarible lets you sell NFTs using the Flow blockchain (the same one used by NBA Top Shot) if you sign up for it using the Blocto wallet, and both it and OpenSea will let you sell using the Polygon blockchain. Both options have much lower fees than those you pay for using the Ethereum blockchain, if any fees at all, so we will at least touch on using them.
As you might have guessed, if there were no catches or downsides to these low / no-fee blockchains, everyone would be using them. At the time of writing, choosing to use Flow on Rarible will limit you to single edition NFTs (one of ones), and you won’t be able to sell them with an auction. Additionally, when you’re using non-Ethereum blockchains like Flow or Polygon, people can’t use Ethereum to purchase your NFTs (at least, not without going through extra, fee-inducing steps). While both platforms do let buyers add funds to their wallet to complete a purchase, having to convert or outright buy another cryptocurrency to nab your NFT may put some collectors off.
(Note: while Polygon does let you use Ethereum, it’s actually Polygon’s version of Ethereum. You can directly transfer Ethereum from its main blockchain over to Polygon and transfer back, but doing so will incur gas fees.)
Do I have to use a marketplace site to create an NFT?
Technically, no. You can create your own smart contract, deploy it to the blockchain of your choice, and then mint your own tokens using it. That’s jumping into the deep end, though, and probably not the route you’ll want to go unless you’re very technical. Most people will want to use one of the platforms discussed above.
Step 4: Set up a wallet
Wallets are the applications you use to store your cryptocurrencies, as well as any NFTs you end up minting or buying. Coinbase has a more in-depth explanation of how wallets work and the different options that are available, but if you’re just getting started, there’s really one main thing you need to worry about: using a wallet that’s compatible with the blockchain you’re using.
MetaMask’s wallet is one of the wallets that’s widely supported by Ethereum-based applications like OpenSea, Foundation, and others and can be used either as a Chrome / Firefox extension or as an iOS / Android app. Coinbase also has its own wallet that you can use as an extension or an app, and it’s supported by most platforms. You may want to consider Coinbase’s wallet if you’re planning on getting into crypto more broadly, as it has support for blockchains not based on Ethereum, like Bitcoin.
MetaMask and Coinbase Wallet’s setup processes are similar. Once you have the browser extension or app installed (MetaMask can be downloaded here, Coinbase Wallet here), click or tap the “Create new wallet” button. Coinbase will ask you for a username, and both will ask you for a password, which you’ll want to make sure is secure (preferably by generating it with and saving it in a password manager).
:no_upscale()/cdn.vox-cdn.com/uploads/chorus_asset/file/23069608/Screen_Shot_2021_11_30_at_16.51.49.png)
Finally, both MetaMask and Coinbase will give you what’s known as a “seed phrase,” which is 12 random words. It’s very important not to lose this, as it will let you recover your account if you, say, uninstall the app or need to set up your wallet on a new device. It’s a good idea to copy it and store it in a very safe location, such as a physical safe or password manager (or both). MetaMask will ask you to repeat the phrase back, while Coinbase Wallet will ask you if you want to store an encrypted copy of it on the cloud if you set it up using the app. If you’re setting Coinbase up with the extension or you choose to manually back it up instead of saving it to the cloud, it’ll be the same process as MetaMask, where you’ll have to re-enter the phrase manually.
If you lose your password and / or security phrase, you’ll be out of luck with both MetaMask and Coinbase Wallet — neither company can do anything to help you. That means you’ll lose access to any cryptocurrency or NFTs stored in that wallet, as well as the accounts that you’ve set up using it. So seriously, keep your password and secret phrase safe.
Finally, you’ll have access to your wallet, which won’t have anything in it yet!
Step 5: Connect your wallet
After you’ve got your wallet set up, you’ll want to connect it with the NFT marketplace you plan on using. OpenSea and Rarible make this easy — clicking the Create button in the top left prompts you to connect your wallet. You’ll then be presented with a list of compatible wallets, and choosing yours will prompt you to go through the connection process.
:no_upscale()/cdn.vox-cdn.com/uploads/chorus_asset/file/23069609/Screen_Shot_2021_11_30_at_16.54.11.png)
If you have Metamask or Coinbase’s extension installed, you’ll see a pop-up asking you if you want to connect your wallet, which can be done with a few button clicks. If you’re using the Coinbase Wallet app, you can also connect to the marketplace by using the QR code scanner (which you can find to the right of your balance on the main wallet screen).
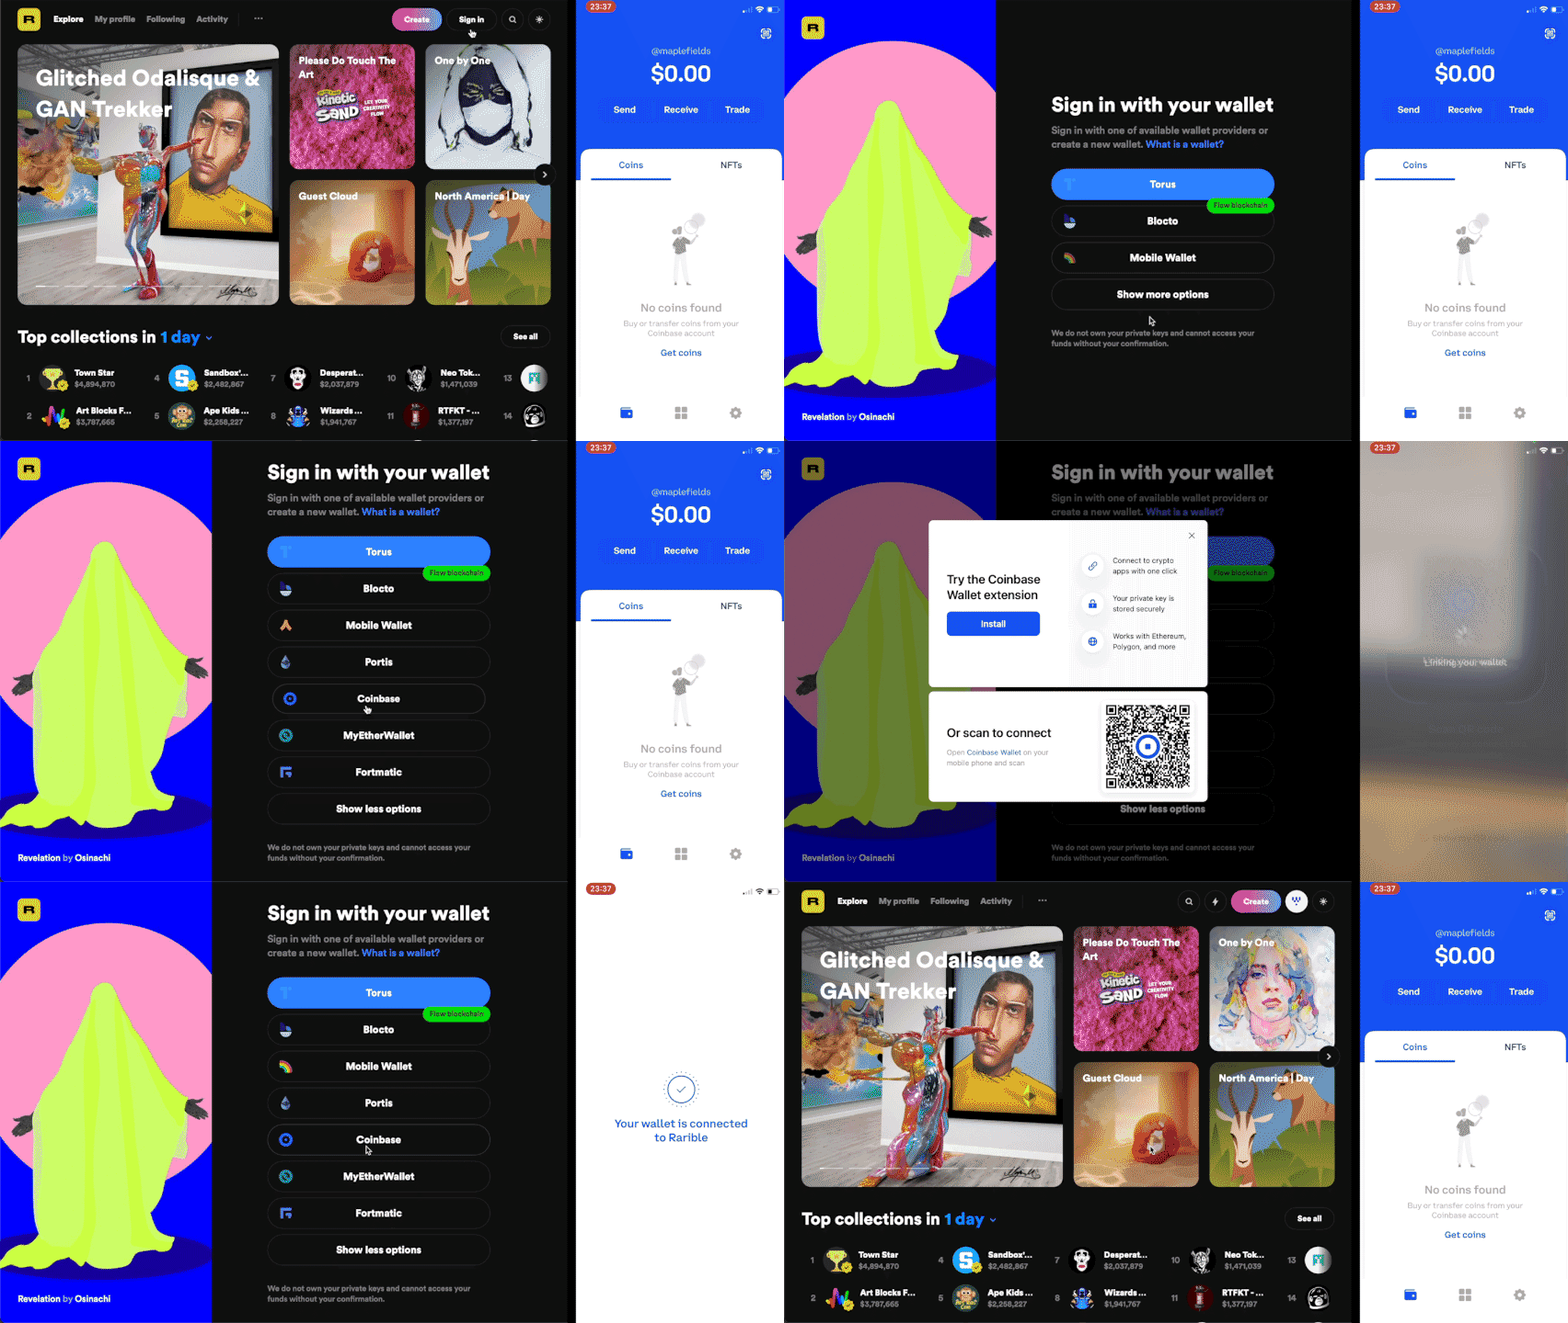
A word of caution for the future: be careful if you see a request to connect to your wallet when you don’t expect it, as scammers could be trying to access your funds or NFTs. As long as you’re on a trusted site, you should generally be okay (at least, as long as something isn’t very wrong — be sure to check transactions to make sure they’re kosher). But if an unknown site asks to connect to your wallet, you should probably think twice before accepting.
Step 6: Create an NFT
After you’ve connected your wallet, you’ll arrive at the page you use to create an NFT (and if you don’t end up there, you can get there by clicking the Create button that both platforms put in the upper right-hand corner).
Before we start creating our NFTs, a word on collections — both platforms support collections, which are pretty much what they sound like. If you want to create a series of NFTs, you can use a collection to do so — on Rarible, you can create one right from the NFT creation screen, which the NFT you’re making will be added to. On OpenSea, you’ll have to go to your profile picture in the top right, then go to My Collections > Create a collection.
We won’t cover collections in this guide, but OpenSea will automatically place the NFT you create into an unnamed collection if you don’t specify one (you can either edit the collection later or move the NFT to another collection), and Rarible lets you sell an NFT as a Rarible Single without a collection.
Now, let’s finally get started on our NFT.
Listing an NFT on OpenSea
After clicking the Create button, you’ll be brought to the create new item page. To start, click the box with an image icon in it, which will let you upload the file you’ll be selling as an NFT (though, do make sure to take note of the file size and type limitations noted above the selector).
After you’ve added your file, give it a name, or title. You can also use the External Link field to add a URL pointing to, say, your website or Twitter account, and you can use the Description field to give potential buyers a better idea of what your NFT is.
:no_upscale()/cdn.vox-cdn.com/uploads/chorus_asset/file/23069597/Screen_Shot_2021_12_06_at_13.12.12.png)
Underneath those fields, you can choose a collection for your NFT if you’ve set one up, as well as add properties, levels, or stats that can basically act as metadata. If you’re selling an NFT that could act as a video game character, for instance, this is where you’d put in their information. If you’re selling a piece of art, you could use the properties panel to add information about it, such as the medium, year, etc. However, all these fields are optional, so a lot of people will probably be able to ignore them.
OpenSea also lets you add text that acts as unlockable content, which the buyer / owner of the NFT will be able to see. You could use this toggle-able field to include something like an invite link to a private Discord, a code to redeem something on an external website, or even just a message thanking them for buying. You can also use the explicit and sensitive content toggle if your NFT is NSFW in nature.
:no_upscale()/cdn.vox-cdn.com/uploads/chorus_asset/file/23069599/Screen_Shot_2021_12_06_at_13.12.26.png)
After those toggles and fields is the dropdown you use to select which blockchain you’re minting your NFT to — the Ethereum chain or the Polygon one. You can see Step 3 for more information on the pros and cons of each, but we’re going to go with Polygon for our example, as it currently doesn’t require paying any fees. If you’re minting with Polygon, you’ll also have the option to mint multiple copies of your NFT.
After you’ve chosen your blockchain, you’ll want to double-check everything. OpenSea lets you change the metadata afterward as long as you haven’t put it up for sale, but it’s good practice to make sure everything’s shipshape before doing anything blockchain-related. And note that you won’t be able to change which blockchain the NFT is on after the fact.
After you’re good to go, you can click the Create button. Depending on the options you’ve selected and what kind of file you’re selling as an NFT, there might be a bit of a wait as things upload. After it finishes, you’ll see a screen saying that your NFT was created.
:no_upscale()/cdn.vox-cdn.com/uploads/chorus_asset/file/23069596/Screen_Shot_2021_12_06_at_13.17.15.png)
However, your NFT isn’t actually up for sale on OpenSea yet — to do that, you’ll have to click off of the congratulations screen to get to your NFT’s page (you can also get to it by clicking on your profile picture, clicking on the Created tab, and selecting the NFT). On the NFT’s page, there’ll be a Sell button.
:no_upscale()/cdn.vox-cdn.com/uploads/chorus_asset/file/23069628/Screen_Shot_2021_12_07_at_00.00.31.png)
With NFTs listed on Ethereum or Polygon, you’ll have the option to create a listing for a fixed price, and on Ethereum, you’ll have the option to create a timed auction as well. For a fixed price listing, you’ll simply put in the amount that you want to sell the item for (listed in Ethereum, but it’ll give you an approximate dollar amount below) and choose how long you want the listing to be available for.
:no_upscale()/cdn.vox-cdn.com/uploads/chorus_asset/file/23068156/Screen_Shot_2021_12_06_at_13.20.38.png)
Since the NFT will be available to purchase as soon as you list it, you can also make it only available to a specific buyer using the “More options” dropdown.
To list your NFT for sale, click the “Complete listing” button. You’ll have to confirm, or sign, a few transactions with your wallet, either using the browser extension or the app. On Polygon, the transactions are free, and you’ll get a screen saying that your item’s been listed.
:no_upscale()/cdn.vox-cdn.com/uploads/chorus_asset/file/23069594/IMG_3285.jpeg)
On Ethereum, you’ll have to do a one-time approval transaction to “initialize” your wallet if it’s your first NFT, which we discussed above. To do so, you’ll need to have Ethereum in your wallet. Buying crypto could be its own separate explainer, but here’s a guide to get you started.
The money for this transaction is only going towards gas, not a fee for OpenSea, so how much it costs depends entirely on how much Ethereum’s gas fees are at the moment. In my original tests in December 2021, I saw prices from around $240 to $450, but in June 2022 those prices had dropped to $50 to $60. It basically all depends on the price of Ethereum and how many people are trying to carry out transactions, so if the fees seem high you may want to wait until the price drops — you can use a site like ETH Gas Station to monitor transaction costs, or watch out for a high fee warning in MetaMask.
:no_upscale()/cdn.vox-cdn.com/uploads/chorus_asset/file/23069595/Screen_Shot_2021_12_06_at_13.29.35.png)
After you’ve approved and signed all the transactions, your NFT will be listed for sale on OpenSea.
Listing an NFT on Rarible
The first question Rarible will ask is which blockchain you want to mint your NFT to, offering you the options of Ethereum, Flow, Tezos, or Polygon. Unlike OpenSea, the site doesn’t cover Polygon fees, so you’ll have to pay to mint or sell an NFT if you’re using that blockchain. For this example, we’ll be using Ethereum.
:no_upscale()/cdn.vox-cdn.com/uploads/chorus_asset/file/23069629/Screen_Shot_2021_12_07_at_00.02.11.png)
After choosing a blockchain, you’ll have to decide whether you want to create a single-edition NFT or a multiple-edition NFT — in other words, whether you want to create a one-of-one NFT, or one that’s limited edition but can be purchased by multiple people. The screens you’ll end up on are largely similar (though you can only use Ethereum if you’re creating a multiple-edition, and you’ll have to specify the number of copies you want to sell), but for this example, we’ll choose single.
After choosing single on Rarible, you’ll end up on the NFT creation screen. The first thing to do is upload the digital file you’re hoping to sell as an NFT, using the Choose File button. Eventually, it’ll end up on the InterPlanetary File System, or IPFS, which is a decentralized way to store media, making it so that your NFT won’t disappear off the internet if one company decides to stop hosting it.
Like OpenSea, Rarible may ask you for a separate preview image for certain types of media, like videos or music — think of this as a video thumbnail or album art, which will display whenever your NFT shows up on the site.
:no_upscale()/cdn.vox-cdn.com/uploads/chorus_asset/file/23067542/Screen_Shot_2021_12_06_at_09.48.41.png)
Next, you’ll want to set your selling options. If you don’t want to sell your NFT just yet, you can flip off the “Put on marketplace” switch, which is on by default. If you do want to sell your NFT, though, you’ll have options.
- “Fixed price” is like creating a store listing — you set a price for your NFT, and if someone wants to pay that price, they can just buy it.
- “Open for bids” lets people submit offers to buy your NFT, which you can either accept or reject.
- “Timed auction” is an auction — you can set a minimum price and choose when the auction will start and how long it will last.
For this example, we’ll go with listing our NFT for a fixed price, which we can enter into the field. You can also choose which currency you’d like to receive (people can, however, send offers in different currencies). When you’re setting your price, remember that Rarible will take 2.5 percent if your NFT sells.
After you choose your selling method and details, you’ll have the option to add unlockable content, which will be provided to the buyer. This could be something like an invite link to a private Discord, a code to redeem something on an external website, or even just a message thanking them for buying.
The next two options let you use choose your collection (we’ll go with Rarible Singles for our example), and the Free Minting option, which lets you choose whether you want to use Rarible’s lazy minting system, which we went over in Step 3. If you turn it off and are using the Ethereum blockchain, you’ll have to pay a gas fee to mint your NFT at the end of this process — when I was testing, the fee was around $20.
:no_upscale()/cdn.vox-cdn.com/uploads/chorus_asset/file/23067546/Screen_Shot_2021_12_06_at_09.49.15.png)
You then give your NFT a name — or title — and a description if you want. Finally, you can choose the royalty percentage. This will change how much of each subsequent sale goes back to you in the future. For example, if someone purchases your NFT for 0.2 ETH and then sells it for 1 ETH in the future, you’ll get a percentage of that sale as well — by default, it’s 10 percent (so 0.1 ETH in our example).
The last option is the Advanced Settings, which lets you add properties to your NFT (which is completely optional but could be useful if you were creating a series of characters with different properties) and alternative description text, which will help make your NFT more accessible.
Double-check that everything is exactly how you want it, as it could be expensive or impossible to change later. Then, when you’re sure your NFT is good to go, click the “Create Item” button.
:no_upscale()/cdn.vox-cdn.com/uploads/chorus_asset/file/23067549/Screen_Shot_2021_12_06_at_09.58.25.png)
Doing this will kick off a series of actions, during which you’ll have to approve some transactions with your wallet. If you’re using a browser extension, you should get a pop-up when Rarible asks for your signature (if not, you can click on the extension’s icon in your browser, and it should present you with any requests). If you’re using an app, you’ll want to open it on your phone, where you’ll be presented with the request.
:no_upscale()/cdn.vox-cdn.com/uploads/chorus_asset/file/23067551/Screen_Shot_2021_12_06_at_09.58.31.png)
After approving a few wallet requests and a moment of waiting, you’ll get a message saying that your NFT has been created. You can click the “View NFT” button to see it, and you can see your collection by going to your profile picture in the top right and clicking “My Profile.”
Hey, I made an NFT, but it hasn’t shown up in my wallet
There’s no need to worry if your wallet has an NFT section and the NFT you made using this guide doesn’t show up in it. Your wallet reads entries from the blockchain to figure out what it should display, and lazy minted NFTs aren’t actually written to the blockchain until someone buys them — thus, they won’t show up in your wallet immediately after you create them.
The hard sell
If everything’s gone well, you’ll now have an NFT listed for sale on either Rarible, OpenSea, or both. However, as sellers have told me, that’s not likely to get you very far — as you’ve seen, the process is relatively complicated, but the gold rush-esque environment around NFTs has led many to try their hand at making one. If you want your creation to actually sell, you’ll likely have to find some way to rise above the noise, either through snazzy marketing or making your art absolutely exceptional (and then probably doing some snazzy marketing). That task, however, I’ll leave in your hands.

